As the development of Xbox Linux patches have halted since 2.6.16 (2006-03-28) I had the wild idea to develop the patches further to be compatible with the newer kernel sources (2.6.38 or 3).
The problem is that I don't have a lot of experience in C and none in assembly needless to say is that I haven't got any experience developing for kernels or drivers. I think this will be a nice challenge, good for the community (if anyone still uses the Xbox as a Linux machine) and it will broaden my knowledge of C and the Linux kernel.
dinsdag 27 september 2011
Xbox server - W.I.P. #3
Friday I began connecting the VGA PCB to the Xbox, I finished this task Saturday so of course I tried the VGA PCB right away.
I then found out that I didn't got any image on the screen. First I thought this was because my monitor possibly wasn't compatible with the signals. So I tried a second monitor and again no image...
I didn't bother to troubleshoot until yesterday. Yesterday (of course when I wasn't at home) I thought of the mode setting that the Xbox requires and which wasn't handled by the PCB and possibly wasn't connected. This would explain why I couldn't get any image on both screens. So when I got home I saw the mode setting pins unconnected, this I immediately fixed in no time. I ran a test and.. again no image.
After a bit of searching I found out that to have a VGA compatible RGB signal the Xbox has to be set to NTSC in stead of PAL which is the default video mode here in Europe. Again this was fixed in no time. But still no image.
The mode setting was correct (mode 1+3) and the signal was NTSC so what else could be wrong?
The Xbox also needs a VGA compatible BIOS and I knew I had one. Cromwell to be exact. So I searched and searched and found nothing that resembled my problem.
So Cromwell didn't give me any visual response. Well I thought, let's try another BIOS, maybe it's just Cromwell trolling me. I still had a copy of Eurasia's generic flash disk laying around and a BIOS binary (Evox m8) on a CD so I flashed this. After flashing I rebooted the Xbox and kept my fingers crossed. And.. my monitor light changed from orange to green and I saw the flubber thing you're supposed to get. VGA worked!! A bit greenish but it worked.
Next I downloaded a VGA compatible BIOS, flashed it with Eurasia's flash disk and it did what I hoped it would. It corrected the colors and VGA was up and running. But how about Cromwell?
I again flashed Cromwell on the Xbox and rebooted the Xbox. Again no image. So maybe VGA isn't initialized at boot, but after Linux has taken control of the display? To check if my predictions were right I burned a copy of Xebian (as it was smaller to download/burn on a disk), popped it in the Xbox and booted it.
To my surprise it took a few seconds and then I saw a shiny happy penguin smiling at me. The display quality was better then expected, the colors were correct, I felt almost as satisfied as Tux.
Here's how I connected my VGA PCB.
The HSYNC and VSYNC points are accessible from the bottom side of the board. I took a bit of soldering tin and for both points I made a cone shaped pin.

Now it was time to solder wires to these pins. As always I stripped, twisted and plated the wires with tin. I then reheated the tin pins and connected the wires to the points.

Below is a picture of the Xbox main board where the AVIP connector used to be. I cleared the holes with very thin solder wick. After this the board was covered in remains of flux. I then cleaned the board with some acetone and a q-tip. The pin numbers are clearly exposed. and the board looks as good as new. The sync wires are visible on the right side of the picture.

The pin-out of the connector is as folowing:
The whole setup looked like this. In the top left is a composite to VGA adapter visible that provided me VGA output while my mod wasn't working, in the top right is the power supply visible, in the bottom left a 2.5" hard drive (the DVD drive is beneath the hard drive, there is a piece of paper in between to isolate the both), in the bottom right is the Xbox visible and in the middle is the PCB with a VGA connector connected.

And this was the display I did it for. As you can see the colors are normal and the display quality is like that of a normal VGA output.

I then found out that I didn't got any image on the screen. First I thought this was because my monitor possibly wasn't compatible with the signals. So I tried a second monitor and again no image...
I didn't bother to troubleshoot until yesterday. Yesterday (of course when I wasn't at home) I thought of the mode setting that the Xbox requires and which wasn't handled by the PCB and possibly wasn't connected. This would explain why I couldn't get any image on both screens. So when I got home I saw the mode setting pins unconnected, this I immediately fixed in no time. I ran a test and.. again no image.
After a bit of searching I found out that to have a VGA compatible RGB signal the Xbox has to be set to NTSC in stead of PAL which is the default video mode here in Europe. Again this was fixed in no time. But still no image.
The mode setting was correct (mode 1+3) and the signal was NTSC so what else could be wrong?
The Xbox also needs a VGA compatible BIOS and I knew I had one. Cromwell to be exact. So I searched and searched and found nothing that resembled my problem.
So Cromwell didn't give me any visual response. Well I thought, let's try another BIOS, maybe it's just Cromwell trolling me. I still had a copy of Eurasia's generic flash disk laying around and a BIOS binary (Evox m8) on a CD so I flashed this. After flashing I rebooted the Xbox and kept my fingers crossed. And.. my monitor light changed from orange to green and I saw the flubber thing you're supposed to get. VGA worked!! A bit greenish but it worked.
Next I downloaded a VGA compatible BIOS, flashed it with Eurasia's flash disk and it did what I hoped it would. It corrected the colors and VGA was up and running. But how about Cromwell?
I again flashed Cromwell on the Xbox and rebooted the Xbox. Again no image. So maybe VGA isn't initialized at boot, but after Linux has taken control of the display? To check if my predictions were right I burned a copy of Xebian (as it was smaller to download/burn on a disk), popped it in the Xbox and booted it.
To my surprise it took a few seconds and then I saw a shiny happy penguin smiling at me. The display quality was better then expected, the colors were correct, I felt almost as satisfied as Tux.
Here's how I connected my VGA PCB.
The HSYNC and VSYNC points are accessible from the bottom side of the board. I took a bit of soldering tin and for both points I made a cone shaped pin.

Now it was time to solder wires to these pins. As always I stripped, twisted and plated the wires with tin. I then reheated the tin pins and connected the wires to the points.

Below is a picture of the Xbox main board where the AVIP connector used to be. I cleared the holes with very thin solder wick. After this the board was covered in remains of flux. I then cleaned the board with some acetone and a q-tip. The pin numbers are clearly exposed. and the board looks as good as new. The sync wires are visible on the right side of the picture.

The pin-out of the connector is as folowing:
| 1 VCC | 13 Mode select 3 |
| 2 audio right | 14 Mode GND |
| 3 audio left | 15 +12v |
| 4 audio right GND | 16 GND |
| 5 audio left GND | 17 pin19 GND |
| 6 sp-dif digital audio | 18 var (Blue) |
| 7 H-Sync | 19 var (Red) |
| 8 V-Sync | 20 pin18 GND |
| 9 Mode select 1 | 21 pin23 GND |
| 10 Mode GND | 22 var (Green) |
| 11 Mode select 2 | 23 var (Composite) |
| 12 Mode GND | 24 pin22 GND |
The whole setup looked like this. In the top left is a composite to VGA adapter visible that provided me VGA output while my mod wasn't working, in the top right is the power supply visible, in the bottom left a 2.5" hard drive (the DVD drive is beneath the hard drive, there is a piece of paper in between to isolate the both), in the bottom right is the Xbox visible and in the middle is the PCB with a VGA connector connected.

And this was the display I did it for. As you can see the colors are normal and the display quality is like that of a normal VGA output.

maandag 26 september 2011
Gentoo la files breakage
I'm a Gentoo user for years now and I've had my share of bumps in the road. I recently had some problems with packages trying to find non existing .la files. I'll take VLC for example. VLC was missing an audio .la file belonging to the nas package. Nas was previously installed on my system and since I removed it, VLC no longer built.
Trying to find the missing .la file didn't help as it was a .la file that was removed. I've also read that Gentoo wants to get rid of the .la files in total. Anyhow, Gentoo has a tool called "lafilefixer", this tries, as the name implies, to fix .la file linkage. Unfortunately this didn't help. There is also a tool called "revdep-rebuild", this tries to fix missing dependencies or better said, broken linkage to dependencies. Paludis has a similar tool called "cave fix-linkage".
Unfortunately fixing the linkage to dependencies didn't work either. So I've searched on the Internet for alternative solutions and I recently found one: removing the .la files that don't belong to any package installed and then fixing broken linkage to dependencies.
This is the script I used to remove the .la files:
To prevent this from happening again I placed a hook in the paludis hooks directory to 'fix' linkage before merging to /.
I installed the hook in /etc/paludis/hooks/auto/
Trying to find the missing .la file didn't help as it was a .la file that was removed. I've also read that Gentoo wants to get rid of the .la files in total. Anyhow, Gentoo has a tool called "lafilefixer", this tries, as the name implies, to fix .la file linkage. Unfortunately this didn't help. There is also a tool called "revdep-rebuild", this tries to fix missing dependencies or better said, broken linkage to dependencies. Paludis has a similar tool called "cave fix-linkage".
Unfortunately fixing the linkage to dependencies didn't work either. So I've searched on the Internet for alternative solutions and I recently found one: removing the .la files that don't belong to any package installed and then fixing broken linkage to dependencies.
This is the script I used to remove the .la files:
#!/bin/bashAfter this I fixed the breakage by running "cave fix-linkage -x" and all was solved.
for f in `find -O3 / -type f -name "*.la" -print0 | xargs -0`
do
if [ -z `cave print-owners $f` ]
then
echo file is orphaned $f
rm $f
fi
done
To prevent this from happening again I placed a hook in the paludis hooks directory to 'fix' linkage before merging to /.
I installed the hook in /etc/paludis/hooks/auto/
#!/usr/bin/env bash
hook_auto_names()
{
echo "merger_install_pre"
}
hook_run_merger_install_pre()
{
source ${PALUDIS_EBUILD_DIR}/echo_functions.bash
einfo_unhooked "Running lafilefixer"
lafilefixer ${IMAGE}
}
vrijdag 23 september 2011
Xbox server - W.I.P. #2
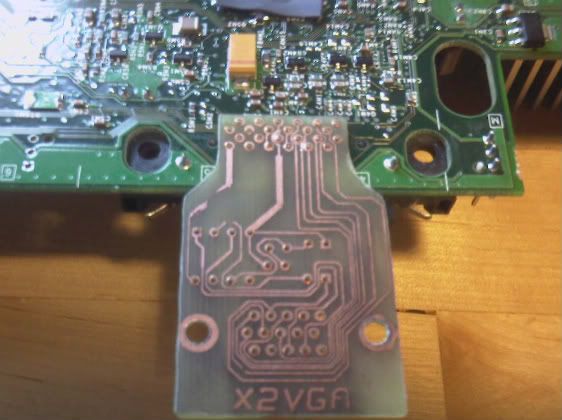
On Tuesday I received the electrical components I ordered. So I immediately started designing a test PCB.
The PCB design was finished on Wednesday and of course I made the PCB as soon as I could. I made the PCB with a laser printer, a glossy photo paper, an iron and some iron 3 chloride.
Yesterday I soldered the components on the PCB.
Today I plan to test if the Xbox and the PCB are nice enough to give me a nice display on my monitor.


zondag 18 september 2011
Xbox server - W.I.P. #1
As I cannot make a VGA adapter right now I started some work on the heat sinks. The stock heat sinks of the Xbox are 'glued' to it with the so called Microsoft goo or bubble gum.
With some gentle force I pulled off the heat sinks of the GPU and CPU. Here you can see the goo.
 To remove the goo I used acetone and some q-tips (this was described on some forums as being cheap and perfectly safe).
 The result was quite good.
 Now I did the heat sinks I moved on to the CPU and GPU. The CPU is on the left and the GPU on the right. You can clearly see the goo on them.
 So I did the same as I did with the heat sinks. Q-tips, acetone and a lot of rubbing. The result is self explaining.
 I ordered some Arctic Silver 5 thermal paste as replacement. I heard good things about it, so I hope it will help some. I want to cool the Xbox as quiet as possible, so passive cooling is a must.
With some gentle force I pulled off the heat sinks of the GPU and CPU. Here you can see the goo.


Xbox server - Kick-off
I just started a new project or better said, restarted an old project.
I've got 2 XBox's laying around and I thought, let's make a server out of these.
I'm first going to try to get VGA output on one of these Xbox's. I tried it a couple of years earlier but failed at it.
The problem seems to be at getting the horizontal and vertical sync signals to give to a VGA connection.
There are 3 known methods of getting the sync signals:
The problem with SOG is that the monitor to be connected on it must support SOG. My monitors don't, and to prevent any future problems, I never attempted this. (Well I think I once did, but it didn't quite work. :-) )
Using a sync splitter
I've tried this method a couple of years earlier. I actually made a PCB for this one.
 This was just a test. I just removed the actual PCB I tried to use, here are two pictures.


As you can see on the PCB I soldered some additional wires. With these wires I tried to fix what didn't work. The monitor kept showing the "not connected" message (before the wires) but after the wires the monitor just went to sleep.
But now I'm going for another try using the internal sync signals.
Internal sync signals
I looked up a tutorial on how to make this magic happen. Now it seems I need some electronics I don't happen to have. So I'm ordering right now :-)
I'm using this tutorial to mod one of my Xbox's.
I already did some work, but I'll put this in another post as this is getting a bit long :-)
I've got 2 XBox's laying around and I thought, let's make a server out of these.
I'm first going to try to get VGA output on one of these Xbox's. I tried it a couple of years earlier but failed at it.
The problem seems to be at getting the horizontal and vertical sync signals to give to a VGA connection.
There are 3 known methods of getting the sync signals:
- Using Sync On Green
- Using a sync splitter
- Using the Xbox's internal sync signals
The problem with SOG is that the monitor to be connected on it must support SOG. My monitors don't, and to prevent any future problems, I never attempted this. (Well I think I once did, but it didn't quite work. :-) )
Using a sync splitter
I've tried this method a couple of years earlier. I actually made a PCB for this one.


As you can see on the PCB I soldered some additional wires. With these wires I tried to fix what didn't work. The monitor kept showing the "not connected" message (before the wires) but after the wires the monitor just went to sleep.
But now I'm going for another try using the internal sync signals.
Internal sync signals
I looked up a tutorial on how to make this magic happen. Now it seems I need some electronics I don't happen to have. So I'm ordering right now :-)
I'm using this tutorial to mod one of my Xbox's.
I already did some work, but I'll put this in another post as this is getting a bit long :-)
maandag 12 september 2011
\s !=
I'm using a lot of regex in Java because it's freaking handy. And so I'm walking trough some HTML and what did I find. The input String "<br> </b>" wasn't matched by the regex "<br>[\\s]*</b>"! Which I found strange because a space is a whitespace, right? WRONG! The original text as it was on the web page was "<br> </b>" and the non-breaking space isn't included in the \s whitespace group.
So how did I solve it?
This problem can be solved by including \u00A0 in the regex ("<br>[\\s\\u00A0]*</b>") or by using \p{javaSpaceChar} in the regex ("<br>[\\p{javaSpaceChar}]*</b>").
The I couldn't find \p{javaSpaceChar} in most of the Java documentation, why? I don't know.
So how did I solve it?
This problem can be solved by including \u00A0 in the regex ("<br>[\\s\\u00A0]*</b>") or by using \p{javaSpaceChar} in the regex ("<br>[\\p{javaSpaceChar}]*</b>").
The I couldn't find \p{javaSpaceChar} in most of the Java documentation, why? I don't know.
Abonneren op:
Posts (Atom)