vrijdag 9 oktober 2020

Adding USB ports to an old router (WRT54GL)

I needed a wireless Linux device with an antenna, preferably free. Luckily I had an old router laying around, as you do, and it already has Linux on it, aren't I a lucky old fella. I hooked it up, brute-forced the password manually by memory and gave the device a long needed firmware upgrade... a 9 year old image.

The problem

Device up and running, next step is popping a shell and start getting software on the thing. Sadly the Linksys WRT54GL only has 4MB internal flash storage, and the OS takes a (relatively) big chunk. If only this old friend had a USB port or something...

The Mod

I quickly stumbled upon possible hardware hacks which listed adding an SD card or USB port(s). For multiple reasons I chose USB, you can disagree with me in the comments below.

Easily I found multiple guides, for multiple versions. The general idea was the same, solder some wires to the PCB, some resistors a USB port and some jenky way of getting 5V, simple enough.

I followed this guide on the OpenWrt wiki and soldered wires to the appropriate resistors (21, 23, 25, 26). Then I proceeded to complete the circuit on a breadboard. I installed the needed USB kernel modules and checked dmesg.

usb.c: new USB bus registered, assigned bus number 1
hub.c: USB hub found
hub.c: 2 ports detected

Halfway there, right? Let's connect a drive.

usb.c: USB device not accepting new address=2 (error=-145)

That doesn't seem like it's working properly...

The this-always-happens-to-me

Okay, so here's the thing. Whenever I attempt to do anything like this it never works for me, either I have some slightly different version or some other glitch-in-the-matrix type thing causes me to encounter corner cases that don't seem to be documented anywhere else. For those who are on the same quest as I have been, I hope this post is helpful to you.

So maybe the guide is wrong? I came across other guides like the DD-WRT one which point to other resistors (19 and 20). So what the hell, let's try that, what have I got to loose?

Long story short this didn't work at all. The USB hub was still detected but alas no devices at all. So I re-soldered the tiny SMDs back to the board. This was a step in the wrong direction, back to the first mod.

Soldered the wires back to 21, 23, 25 and 26 and broke out my Google-Fu.

The clue

Since I am messing with hardware I'm assuming the fault is there so searching for the error seemed to return a lot of useless results as most of them were not soldering shit on their machines. There was however one slight clue on this site where someone builds their own USB device? (didn't read it fully, sorry bro.)

Apparently the error 'device not accepting address' means that the pull-up resistor is detected, but not necessarily anything else. Clock speed, zener diodes and I/O setting of pins can be wrong.

 The shot in the dark

So, there's something going on with the pull-up resistor apparently. Maybe the signal is too weak? I don't know, I'm not qualified to work on this. So I removed the 22ohm resistors between the data wire and the USB port and tried again, what's the worst that could happen?

hub.c: new USB device 00:03.0-1, assigned address 2

Fuck yeah! Success at last.

The end-result

I created a prototype PCB and screwed that to the case, I'm tired of using hot glue, after a while it loses it's grip. I added a connector to the board so that I could just plug in a regular PC USB bracket I had.

Cut 2 holes with a knockoff Dremel for the USB ports and drilled two holes to mount it.

The end result looks nice, except for the leftover duct-tape from previous abuse.

The solution

So this is what I ended up doing. I soldered a wire to each of the resistors 21, 23, 25 and 26 on the side closest to the Broadcom chip. These are the USB data lines.

21 = data+

23 = data-

25 = data+

26 = data-

Each wire is connected directly to the appropriate USB pin and to a 15K resistor which goes to ground.

USB also requires a 5V power source which I provided with a 7805. I stole 12V from the WRT54GL's power socket as input for the 7805 and tapped the ground from the power socket as well. 12v and ground go to the 7805 and 5V comes out, simple! All of the power circuits I encounter add capacitors so I did this as well, however as I don't have a lot of capacitors laying around so I used different ones (50V, 0.22uF or something, does this really matter that much? What's the science behind this?) The electrolytic capacitors are connected between 12V-GND and 5V-GND, mind the capacitor direction!

The firmware I used is this image: http://downloads.openwrt.org/backfire/10.03.1/brcm-2.4/openwrt-brcm-2.4-squashfs.trx

To get the USB mod working we need drivers:

opkg update
opkg install kmod-usb-ohci kmod-usb-storage kmod-usb-core

Well, that's it, now my old router has two USB 1.1 ports.


zaterdag 27 juli 2013

Propagate nested Python contexts

Recently I've been playing around with Python's context managers. Context managers are used in combination with the 'with' statement. As an example a file can be opened and closed in a context.
The file will be open in the 'with' block and closed  after the 'with' block.

with file('filename.txt') as f:
    for line in f:
        print(f)

To implement a context manager you'll have to create a class that inherits from object with a '__enter__' and '__exit__' method:

class Context(object):
    def __enter__(self):
        """Enter context"""

    def __exit__(self):
        """Exit context"""

Note that the syntax 'with <context_manager> [as <target>]:' assigns a target variable. This is the returned value of the '__enter__' method.

In my case I wanted to be able to nest contexts and ensure that nested contexts were propagated to the root context. My first idea was to have a class attribute and assign that in the '__enter__' method and return that value (even in nested contexts). This was the result:

class Context(object):
    current = None

    def __enter__(self):
        """Enter context"""
        if not Context.current:
            Context.current = self
        return Context.current

    def __exit__(self):
        """Exit context"""
        Context.current = None

After a quick test I noticed a nested context set the current context as None upon exit (the third 'print' statement will print None):

with Context() as root:
    print(Context.current)
    with Context() as nested:
        print(Context.current)
    print(Context.current)

To prevent this I modified the '__exit__' method to check if the '__exit__' is called for the root context. The final result looks like this:

class Context(object):
    current = None

    def __enter__(self):
        """Enter context"""
        if not Context.current:
            Context.current = self
        return Context.current

    def __exit__(self):
        """Exit context"""
        if self is Context.current:
            Context.current = None

By using the 'is' comparison the context only gets closed when the '__exit__' method is called for the root context manager.

vrijdag 23 november 2012

Cracking Redmine passwords

As I am running Redmine on my server and I wanted to test security I wanted to see if I could crack some passwords of my users.

Redmine uses sha1 to store passwords, salted with a random uhm.. salt.

In pseudo code the algorithm to create a password hash would look like this:
sha1(salt + sha1(password))

I made a dump of the users table in the format "login:password_hash:salt" and wrote a small Python based cracker that could parse this and iterate through a dictionary file.

Out of the 16 users in the table 2 of them used their login as their password.. 1 used his first name and 1 used a password that was cracked within seconds.
Needless to say, I locked their accounts [insert evil laugh] and I'm going to do this more often. (Maybe automated, with email notifications or something.)

O, and for those who want to do this sort of unethical thing too, here's the script:
#!/usr/bin/env python

from optparse import OptionParser
import hashlib

parser = OptionParser(usage="usage: %prog [options] userfile wordlist")
(options, args) = parser.parse_args()

if len(args) != 2:
    parser.error("Incorrect number of arguments")

def import_users():
    user_file = open(args[0], 'r')
    users = [] # format: (login, password_hash, salt)
    for line in user_file.readlines():
        if not line.startswith('#'):
            users.append(line.strip().split(':'))
    user_file.close()
    return users

def calculate_hash(password, salt):
    hashed_password = hashlib.sha1(password).hexdigest()
    hash = hashlib.sha1(salt+hashed_password).hexdigest()
    return hash


users = import_users()

# Try username as password
cracked = []
for user in users:
    word = user[0].strip()
    if user[1] == calculate_hash(word, user[2]):
        print "Password of user '%s' is '%s'" % (user[0], word)
        cracked.append(user)
for user in cracked:
    users.remove(user)

wordlist = open(args[1], 'r')
for word in wordlist:
    cracked = []
    for user in users:
        if user[1] == calculate_hash(word, user[2]):
            print "Password of user '%s' is '%s'" % (user[0], word)
            cracked.append(user)
    for user in cracked:
        users.remove(user)
wordlist.close()

Linux shorthand for rename/move/copy

As a Linux user you frequently use the terminal as it is powerful as [insert sentence enhancer].
A frequent thing you do in a terminal is copy or move/rename a file. When you do frequent things you'll get frequent annoyances (should sound familiar).

Example:
When you want to copy a file from "some/subdir/of/the/current/working/dir/file.ext" to "some/subdir/of/the/current/working/dir/file.ext.bak" you have to type the entire path twice. Even with tab completion it gets annoying.

Solution:
Use them fancy curly bracket things!
Instead of this:
 cp some/subdir/of/the/current/working/dir/file.ext some/subdir/of/the/current/working/dir/file.ext.bak  
Do this:
 cp some/subdir/of/the/current/working/dir/file.ext{,.bak}  

The curly brackets are interpreted to multiply the string it is in and make all combinations. So the latter is transformed to the first.
You can also embed them:
 echo a{,b{,c}}  
That's translated to:
 echo a ab abc  

donderdag 22 november 2012

PXE boot SystemRescueCd using a Linux server

I needed to get some things done on a PC that didn't have a optical drive so I needed to get creative. I know there is this thing called PXE (Preboot eXecution Environment) but I never tried it. When I started doing some research it was exactly what I needed.


I always hated it when I saw PXE initializing because it meant the PC couldn't boot from disk. Little did I know PXE is an awesome invention.

Get on with the how-to already!! Ok, Ok..

The ingredients I used are:
  • A Linux server (I prefer Gentoo, but any distribution will do).
  • Root access to the server.
  • A client PC which supports PXE. psst.. VirtualBox supports PXE ;-)
  • A network to connect the client and server. You will be running a DHCP server on this network. I used a cross cable. You can bridge VirtualBox to the interface you use.
  • An Internet connection on the server (you need to download a few things).
  • A couple hours of time.
The server will need a static IP. I use 192.168.1.1 and a subnet of 255.255.255.0. 192.168.1.1/24 for short. Wherever you see this, replace it with your own.
Since I want this set-up to work with a specific interface I've used 'eth0'. So If you want to have this too, substitute 'eth0' with your own.

For those who compile their own kernel, these options need to be enabled:
 CONFIG_EXPERIMENTAL=y  
 CONFIG_PACKET=y  
 CONFIG_UNIX=y  
 CONFIG_INET=y  
 CONFIG_IP_MULTICAST=y  
 CONFIG_NFSD=y  
 CONFIG_NFSD_V3=y  

The interface you will be running the DHCP server from should be configured for multicast. The way to do this is:
 ifconfig eth0 multicast  

Running ifconfig should then mention the interface is multicast, something like
 UP BROADCAST MULTICAST  

or
 UP BROADCAST RUNNING MULTICAST  

As long as it says "MULTICAST" you're doing good so far! Hooray!

The interface will need a static IP, you can do it using ifconfig or use your network manager for this.
 ifconfig eth0 192.168.1.1/24  

Note: I had some trouble since I'm using NetworkManager, the init scripts kept starting NetworkManager somehow so I needed to configure my eth0 with NetworkManager.

Now it's time to install the DHCP server, as a good Linux user you use your distro's package manager. As a Gentoo user you would normally use Portage for this, but I'm using Paludis. Mind that you want to run a DHCP server, so the 'server' use flag should be turned on for this package.

Using Portage you should do:
 emerge dhcp  

But since I'm using Paludis I do:
 cave resolve dhcp -x  

Now that we have dhcpd installed we can configure it.
Fire up your favorite text editor hint: vim and edit "/etc/dhcp/dhcpd.conf"
This is a minimal config I did, so consult the documentation if you want more.
 subnet 192.168.1.0 netmask 255.255.255.0  
 {  
   range 192.168.1.2 192.168.1.10;  
   filename "pxelinux.0";  
   next-server 192.168.1.1;  
 }  

Now if you want your DHCP server to run on a specific interface, on Gentoo you can edit "/etc/conf.f/dhcpd":
 IFACE="eth0"  

If you (and I) did everything right you should be able to start the DHCP daemon:
 /etc/init.d/dhcpd start  

IIRC if you do this on a Debian flavored machine it will slap you on the wrist and tell you to use something like "services [service] start" instead. The choice is yours.

Now the second part of the PXE server, the TFTP service.
Go ahead and install the TFTP server using your favorite package manager (package is called "tftp-hpa" in the Gentoo repo):
 cave resolve tftp-hpa -x  

Once the TFTP service is installed it's time to configure it. In my Gentoo machine I only had to edit the file "/etc/conf.d/in.tftpd":
 INTFTPD_PATH="/var/tftpd"  
 INTFTPD_OPTS="--listen --secure ${INTFTPD_PATH} --address 192.168.1.1"  

I like to use the long version of switches in config files because they are more readable then -a, -t, -3, etc.
The "--listen" switch tells TFTP to listen, the "--secure" switch locks TFTP in the directory specified (you may only specify one directory) and the "--address [IP]" switch tells TFTP to only accept connection to a specified IP address.
The directory specified by INTFTPD_PATH must exist, if it doesn't, create it.

You can now start the TFTP server:
 /etc/init.d/in.tftpd start  

You may have noticed the directory TFTP is serving is empty. We're now going to fix that. For that, we need syslinux.
Go ahead and install syslinux with your favorite package manager:
 cave resolve syslinux -x  

Once syslinux is installed you can copy over the PXELinux files to the TFTP directory:
 cp /usr/share/syslinux/pxelinux.0 /var/tftpd  
 cp /usr/share/syslinux/menu.c32 /var/tftpd  
 mkdir /var/tftpd/pxelinux.cfg  
 touch /var/tftpd/pxelinux.cfg/default  

Why did we touch "/var/tftpd/pxelinux.cfg/default"? Because we're going to edit it now. So fire up your text editor and write something like:
 prompt 0  
 timeout 200  
 default menu.c32  
   
 menu title siebz0r's awesome PXE boot  
   
 LABEL SystemRescueCd  
   kernel sysresccd/rescue32  
   append initrd=sysresccd/initram.igz dodhcp setkmap=us rootpass=somepassword nfsboot=192.168.1.1:/var/nfs/sysresccd  

This is a sample to present a menu with the option to boot SystemRescueCd. SystemRescueCd accepts some kernel parameters, the interesting one for this set-up is nfsboot. "nfsboot=192.168.1.1:/var/nfs/sysresccd" instructs SystemRescueCd to mount "/var/nfs/sysresccd" from server "192.168.1.1" through NFS.

NFS? Yeah, we're getting to it..

Install NFS using your package manager:
 cave resolve nfs-utils -x  

When this is done edit "/etc/exports" using your favorite text editor:
 /var/nfs/sysresccd  192.168.1.0/24(ro,no_subtree_check,all_squash,insecure,anonuid=1000,anongid=1000)  

This configures NFS to export "/var/nfs/sysresccd" to clients in the network "192.168.1.0/24". Options are copied from SystemRescueCd's wiki.

Now download SystemRescueCd to "/some/dir/sysresccd.iso" and mount it:
 mount -o loop /some/dir/sysresccd.iso /mnt/cdrom  

Now copy over the needed files:
 mkdir /var/tftpd/sysresccd  
 cp /mnt/cdrom/isolinux/rescue32 /var/tftpd/sysresccd  
 cp /mnt/cdrom/isolinux/initram.igz /var/tftpd/sysresccd  
   
 mkdir /var/nfs/sysresccd  
 cp /mnt/cdrom/sysrcd.dat /var/nfs/sysresccd  
 cp /mnt/cdrom/sysrcd.md5 /var/nfs/sysresccd  

And at last start NFS:
 /etc/init.d/nfs start  

Well.. that's all there is to it.
Now fire up a client with PXE support on the same network and see your awesome PXE boot menu:

maandag 19 november 2012

Wham! Bam! Thank you, mdadm!

For all who don't know what mdadm is, mdadm is a software RAID tool for Linux. Now we've got that out of the way...

As any other Über-geek I have a Linux server running some software and storing all of my precious data and of course my software repositories. As I have had the pleasure of data loss a couple years back I decided to use RAID 5 for my server. Of course I'm a student (at the time writing), and I don't have a lot of money because I'm not a greedy bastard. :-) I of course went for a software RAID using mdadm as my weapon of choice.

My server is an old desktop computer (I won't name the brand, but can ensure you it is notorious for.. well.. (since there is no other way to put this) sucking). After infecting the PC with penguins I found the server pretty damn good. Lucky me :-D
The *cough* server *cough* has a AMD Athlon 64 X2 3800+, 2GHz isn't too bad for downloading crap, serving Redmine and some software repositories like SVN and Mercurial. (No GIT, I should be ashamed.) It came with IIRC 1GB of RAM which I naturally upgraded to 2GB as I had 1GB laying around. After stripping some useless hardware like a graphics card I popped in a cheap-ass soft-RAID card and 4x500GB, you can guess the rest.

After some time I wanted to upgrade the thing as I had another system that I didn't use. The upgrade would consist of dual core to quad core, 2GB to 5GB (2x2GB 2x512MB) and 4x500GB to 4x1TB.

The memory upgrade is successful and the CPU upgrade didn't work as the motherboard didn't support the quad core.

The hard drives would be tricky as it would consist of yanking out one drive at a time and replacing them with a bigger drive. As mdadm f*ckt me royally in the past I decided to backup my RAID first. I had an external drive of 1TB laying around and used rsync to create a full backup (yeah I have a sh*tload of hardware I don't actually use but comes in handy sometimes).

Today I spent a couple hours of upgrading and soon it was time for the big drive swap. Mdadm reported earlier today that one of the drives failed, so that one was first to be replaced. Using hdparm to check the serial of the drive I recognized the drive and replaced it with a 1TB disk. After running "mdadm /dev/md0 --add /dev/new-drive" it started recovery. Of course this is where mdadm screwed me over again and showed me something like "[U_U_]" or "[_UU_]". (U means that a drive is Up and _ means a drive is down, or something.)

As I have a ramdisk (initramfs, initrd, etc.) with mdadm build in and busybox as a rescue shell I tried to force mdadm to assemble the array. Assembly didn't work so I tried re-creating them (keeping the data) by issuing "mdadm --create /dev/md0 --raid-devices=4 --level=5 --assume-clean /dev/sd[abc] missing" this worked.. until I invited /dev/sdd to the party (what a party pooper).

I am now creating a RAID 5 consisting of 4x1TB using mdadm (I guess I never learn). I guess I'll be restoring backups somewhere tomorrow.

Lesson learned: never trust mdadm! (or make backups before screwing around with mdadm)

dinsdag 9 oktober 2012

Starting development UML tool

Today I decided to start development on an idea I had a couple months earlier. I'll start with a quick intro.

The idea is to develop the ultimate UML tool. A free to use (at least for non-profit and education) UML tool capable of creating a wide range of tightly entwined diagrams. Of course I did some research about tools that are already available. A commonly used tool is Visual Paradigm. Visual paradigm supports a wide range of diagrams and is quite easy to use. However it is a tool that quickly loses great functionality when using the free version. I'm also (ironically as a Java developer) not too fond of Java based desktop applications. I find such applications to feel 'heavy'.

There are more UML applications available (Umbrella, BoUML to name a few), but they support only a couple of diagrams and are not (in my opinion) ready for professional use.

The application I'm developing is currently named OUDS (Open UML Documentation standard, see my earlier post about it), but it needs another name for obvious reasons.
I chose Python as my weapon of choice to develop the application. Python has high performance, is cross platform and seems simple enough. For the GUI I picked wxPython. wxPython seems to provide a native look and feel, so my users will feel home right away. :-)

As each software project starts with requirements gathering I thought I'd start off with creating a solution for this. Obviously the requirements need to be stored in some way. Luckily the guys at omg.org had a (sort of) solution available. Requirements Interchange Format (ReqIF) provides a standardized way to store requirements, just what I needed. I also found a page on the Eclipse site stating plans to use this format for UML tools.

As I am quite new to Python this should be a nice experiment. :-)

vrijdag 30 maart 2012

Javadoc confusion

As a programmer you often need to look into the documentation. This is of course necessary to know what the code does and how to properly use supplied code. Expecting proper documentation is one of the 'high' standards I assume is provided in code. After all communication is the most important aspect of collaboration.

Javadoc is the standard when writing Java code. A proper Javadoc should look like this:
/**
 * Generate an informational page of this class in the supplied format.
 * Valid formats are "html" and "plain".
 * @param format The format to create the page in.
 * @throws FormatUnknownException If the format supplied by "format" is unknown.
 */
public Page createInfoPage(String format)
{
    ...
}
Everything should be documented so one doesn't have to look at the source code to know what the code does.

To my amazement I found this in the Javadoc supplied by Oracle:
Throws:
NamingException - if a naming exception is encountered
Really? This is not useful at all. How am I supposed to know how to prevent this exception or how do I present this to my users? "Something went wrong?"

As a bonus I'm going to leave this here, just something I found when reviewing code as an assignment for school. I just didn't know whether to laugh or to cry.

/**
* Returns a short description of the servlet.
*/
public String getServletInfo() {
    return "Short description";
}

maandag 6 februari 2012

Hosting multiple Trac environments

Trac is in my opinion a great tool to manage projects. Although most Trac installations are aimed at software development projects this isn't necessary. Trac can be a great tool to manage non-software-development projects too.
I use Trac for almost any project and so I have have a server running with several instances of Trac. One instance per project. The different Trac installs I manage are accessed through a subdomain, trac.example.org for example. Each Trac instance is located in a virtual directory, e.g. trac.example.org/trac1, trac.example.org/trac2, etc.

For some projects I use subversion. I configured apache to serve subversion through DAV. The subversion repositories are accessible using svn.example.org as subdomain and a virtual directory per repository, similar to Trac.

Now as I am the only user of these projects I used a messy configuration that led to some sort of single sign on. Now I've reached the point that more people are going to use Trac and SVN, so the single sign on is no longer desirable (except for me, the administrator). So I came up with a solution to let apache determine access at directory level and let Trac manage its own permissions.

In my apache's "vhost.d" directory I've put a file named trac.conf. This configuration file looks like this:
<IfDefine TRAC> #only run this file if TRAC is defined
        <IfModule !dav_svn_module> #load dav_svn_module if it isn't loaded already (required by authz_svn_module)
                LoadModule dav_svn_module modules/mod_dav_svn.so
        </IfModule>
        <IfModule !authz_svn_module> #load authz_svn_module if it isn't loaded
                LoadModule authz_svn_module modules/mod_authz_svn.so
        </IfModule>
        Listen 443 #listen on port 443 (SSL)
        NameVirtualHost *:443
        <VirtualHost *:443>
                ServerName trac.example.org #hostname, just an example
                Include /etc/apache2/vhosts.d/ssl.include #include some ssl stuff
                Include /etc/apache2/vhosts.d/trac/*.conf #include trac projects

                Alias /[^/]+/chrome/common /var/www/trac/common #map common trac libs

                <Location />
                        SVNPath /var/www/trac #directory containing Trac http dirs
                        AuthzSVNAccessFile /var/www/trac/access #policy file
                        Require valid-user
                        AuthType Digest
                        AuthName "/" #must match the realm in the digest file
                        AuthUserFile /var/www/trac/trac.htpasswd #the digest file
                        Order deny,allow
                        SSLRequireSSL #because I want things to be safe :-)
                </Location>
        </VirtualHost>
</IfDefine>

In the "vhost.d" directory I have a directory named "trac" containing config files that create a trac instance.
example:
<IfDefine TRAC>
        WSGIScriptAlias /project1 /var/www/trac/project1/cgi-bin/trac.wsgi
        <Directory /var/www/trac/project1/cgi-bin>
                WSGIApplicationGroup %{GLOBAL}
                Order deny,allow
                Allow from all
        </Directory>
</IfDefine>
 This file only maps the virtual directory to the Trac wsgi script, generated by trac-admin.

The Trac hosting is done with this. The SVN hosting is done by a module. The module is located in apache's "modules.d" directory and it's named "47_mod_dav_svn.conf".
Mine looks like this:
<IfDefine SVN> #only host when SVN is defined
        <IfModule !dav_svn_module> #load dav_svn_module
                LoadModule dav_svn_module modules/mod_dav_svn.so
        </IfModule>
        <IfDefine SVN_AUTHZ>
                <IfModule !authz_svn_module> #load authz module if desired
                        LoadModule authz_svn_module modules/mod_authz_svn.so
                </IfModule>
        </IfDefine>

        <VirtualHost *:443> #again only listening on SSL
                ServerName svn.example.org
                Include /etc/apache2/vhosts.d/ssl.include #include common ssl stuff
                <Location />
                        DAV svn
                        SVNParentPath /var/svn #directory containing the repositories
                        AuthType Digest
                        AuthName "/" #matching the digest realm
                        AuthUserFile /var/www/trac/trac.htpasswd #same digest file as the one used for Trac
                        AuthzSVNAccessFile /var/svn/access #access file for all SVN repositories
                        Order deny,allow
                        Require valid-user
                        SSLRequireSSL #require SSL :-)
                </Location>
        </VirtualHost>
</IfDefine>

Now I can define access for SVN per repository using a ACL file. Example:
[groups]
admin = admin, siebz0r
prjA = foo
prjB = bar

[/]
@admin = rw

[project-A:/]
@prjA = rw

[project-B:/]
@prjB = rw

The file defines 3 groups:
  • admin
  • prjA
  • prjB
admin has read/write access to the root directory of all projects.
prjA only has read/write access to the project-A repository.
prjB only has read/write access to the project-B repository.

note: You can do more things like add a group to a group.
To revoke all permissions in a directory simply specify the user or group followed by a =.
For example if I would like to revoke all permissions for "foo" I'd write a line "foo = " under the directory I want.

The file for the Trac environments is likewise. The difference is that in stead of "[project-A:/]" I would have to specify "[/project-A]" to configure the directory.
Only read access is required as the rest of the permissions depend on Trac's configuration.

The only caveats are that if you use a global config/policy file for all Trac environments and if a user has access to multiple Trac environments, the user has the same permissions in all environments. Luckily this doesn't create a problem for me.

woensdag 1 februari 2012

UML as text?

Since I'm working a lot with UML these days I found the need for an open source UML tool that works on Linux and could do more than just a class diagram or a sequence diagram.
Some tools I tried were StarUML, Visual Paradigm (which I use for my education), Umbrello and Dia. All these tools have their good and bad points.

As a die hard Linux user I always try to avoid Windows based applications for obvious reasons, so my experience with StarUML wasn't really good. I believe that if you're a Windows user It's a great tool, but as I said I was looking to do more then a hand full of diagrams.


Umbrello is a neat looking tool, QT based (which I like) and is cross platform. Too bad Umbrello doesn't support all the diagrams I want it to. Umbrello also seemed to crash quite often and it sometimes didn't behave to my liking. (resizing classes in class diagrams made text in the class jump out of the class, etc).

Dia is a well known diagram tool which I use quite often to draw a quick diagram. Unfortunately Dia is a very simple tool and it isn't flexible enough (or it is too flexible). Diagrams need a lot of work to keep them clean. Linking to other diagrams isn't supported and as I hate using a mouse, Dia isn't my tool of choice. I might as well use Microsoft Visio. :-P

Visual Paradigm suited my needs quite fine. It's a great tool if you want to document a lot of diagrams and it also has some neat features like reverse engineering. Linking to other diagrams within Visual Paradigm is allowed and this is super handy. Visual Paradigm however is based on Java (which is a fine language to code in, but doesn't run smooth on my Linux laptop). The user interface is one big mess and the automatic update feature is super annoying, as is the message box in the bottom of the screen. (message box takes literally half the screen on a default install) A lot of features and options I never touched or couldn't find because the UI isn't quite self explaining. The most annoying thing about Visual Paradigm is that it requires an Internet connection to check the license key, each time you start the damn thing. As I am on the road a lot this forms a problem quite often.
Visual Paradigm also comes in two flavors, a paid (Professional, Enterprise, etc) version and a free (community) version. The school I go to provides me with a professional edition so I can create almost all diagrams. However the community edition only allows to create a couple of these (class diagram, sequence diagram, etc.).
Today I wanted to create a diagram and so I fired up Visual Paradigm, it was then I discovered the license key was expired. This left me with yUML.


yUML is an on-line tool that allows you to create a couple of diagrams from text! It then generates an image for you. This is when I came up with an idea that could possibly be quite helpful. A textual representation of UML that can be used as a standard. I'm calling this project "OUDS", Open UML Definition Standard.
OUDS is going to be a way to define any diagram as text. This way a set of libraries can be made in multiple language that can work with an open standard. On top of those libraries a developer can create a GUI tool or anything that would be handy. As a developer I find it my task to take a look at this and if it's possible, create a set of libraries so developers can import, export, parse and do other kinds of neat things.

dinsdag 27 september 2011

Xbox Linux kernel development

As the development of Xbox Linux patches have halted since 2.6.16 (2006-03-28) I had the wild idea to develop the patches further to be compatible with the newer kernel sources (2.6.38 or 3).
The problem is that I don't have a lot of experience in C and none in assembly needless to say is that I haven't got any experience developing for kernels or drivers. I think this will be a nice challenge, good for the community (if anyone still uses the Xbox as a Linux machine) and it will broaden my knowledge of C and the Linux kernel.

Xbox server - W.I.P. #3

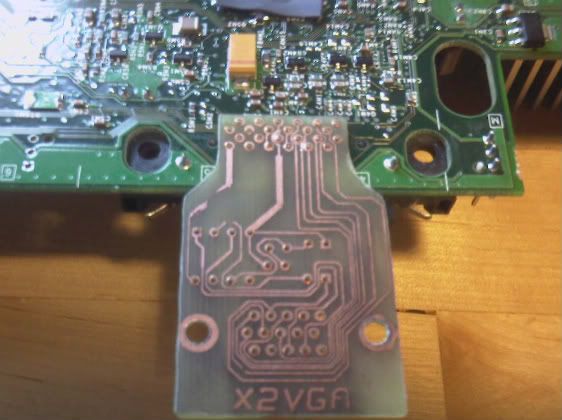
Friday I began connecting the VGA PCB to the Xbox, I finished this task Saturday so of course I tried the VGA PCB right away.
I then found out that I didn't got any image on the screen. First I thought this was because my monitor possibly wasn't compatible with the signals. So I tried a second monitor and again no image...

I didn't bother to troubleshoot until yesterday. Yesterday (of course when I wasn't at home) I thought of the mode setting that the Xbox requires and which wasn't handled by the PCB and possibly wasn't connected. This would explain why I couldn't get any image on both screens. So when I got home I saw the mode setting pins unconnected, this I immediately fixed in no time. I ran a test and.. again no image.
After a bit of searching I found out that to have a VGA compatible RGB signal the Xbox has to be set to NTSC in stead of PAL which is the default video mode here in Europe. Again this was fixed in no time. But still no image.

The mode setting was correct (mode 1+3) and the signal was NTSC so what else could be wrong?

The Xbox also needs a VGA compatible BIOS and I knew I had one. Cromwell to be exact. So I searched and searched and found nothing that resembled my problem.
So Cromwell didn't give me any visual response. Well I thought, let's try another BIOS, maybe it's just Cromwell trolling me. I still had a copy of Eurasia's generic flash disk laying around and a BIOS binary (Evox m8) on a CD so I flashed this. After flashing I rebooted the Xbox and kept my fingers crossed. And.. my monitor light changed from orange to green and I saw the flubber thing you're supposed to get. VGA worked!! A bit greenish but it worked.
Next I downloaded a VGA compatible BIOS, flashed it with Eurasia's flash disk and it did what I hoped it would. It corrected the colors and VGA was up and running. But how about Cromwell?

I again flashed Cromwell on the Xbox and rebooted the Xbox. Again no image. So maybe VGA isn't initialized at boot, but after Linux has taken control of the display? To check if my predictions were right I burned a copy of Xebian (as it was smaller to download/burn on a disk), popped it in the Xbox and booted it.
To my surprise it took a few seconds and then I saw a shiny happy penguin smiling at me. The display quality was better then expected, the colors were correct, I felt almost as satisfied as Tux.

Here's how I connected my VGA PCB.
The HSYNC and VSYNC points are accessible from the bottom side of the board. I took a bit of soldering tin and for both points I made a cone shaped pin.

Now it was time to solder wires to these pins. As always I stripped, twisted and plated the wires with tin. I then reheated the tin pins and connected the wires to the points.

Below is a picture of the Xbox main board where the AVIP connector used to be. I cleared the holes with very thin solder wick. After this the board was covered in remains of flux. I then cleaned the board with some acetone and a q-tip. The pin numbers are clearly exposed. and the board looks as good as new. The sync wires are visible on the right side of the picture.

The pin-out of the connector is as folowing:
1 VCC 13 Mode select 3
2 audio right 14 Mode GND
3 audio left 15 +12v
4 audio right GND 16 GND
5 audio left GND 17 pin19 GND
6 sp-dif digital audio 18 var (Blue)
7 H-Sync 19 var (Red)
8 V-Sync 20 pin18 GND
9 Mode select 1 21 pin23 GND
10 Mode GND 22 var (Green)
11 Mode select 2 23 var (Composite)
12 Mode GND 24 pin22 GND

The whole setup looked like this. In the top left is a composite to VGA adapter visible that provided me VGA output while my mod wasn't working, in the top right is the power supply visible, in the bottom left a 2.5" hard drive (the DVD drive is beneath the hard drive, there is a piece of paper in between to isolate the both), in the bottom right is the Xbox visible and in the middle is the PCB with a VGA connector connected.

And this was the display I did it for. As you can see the colors are normal and the display quality is like that of a normal VGA output.

maandag 26 september 2011

Gentoo la files breakage

I'm  a Gentoo user for years now and I've had my share of bumps in the road. I recently had some problems with packages trying to find non existing .la files. I'll take VLC for example. VLC was missing an audio .la file belonging to the nas package. Nas was previously installed on my system and since I removed it, VLC no longer built.
Trying to find the missing .la file didn't help as it was a .la file that was removed. I've also read that Gentoo wants to get rid of the .la files in total. Anyhow, Gentoo has a tool called "lafilefixer", this tries, as the name implies, to fix .la file linkage. Unfortunately this didn't help. There is also a tool called "revdep-rebuild", this tries to fix missing dependencies or better said, broken linkage to dependencies. Paludis has a similar tool called "cave fix-linkage".
Unfortunately fixing the linkage to dependencies didn't work either. So I've searched on the Internet for alternative solutions and I recently found one: removing the .la files that don't belong to any package installed and then fixing broken linkage to dependencies.
This is the script I used to remove the .la files:
#!/bin/bash
for f in `find -O3 /  -type f -name "*.la"  -print0 | xargs -0`
do
        if [ -z `cave print-owners $f` ]
        then
                echo file is orphaned $f
                rm $f
        fi
done
After this I fixed the breakage by running "cave  fix-linkage -x" and all was solved.
To prevent this from happening again I placed a hook in the paludis hooks directory to 'fix' linkage before merging to /.
I installed the hook in /etc/paludis/hooks/auto/

#!/usr/bin/env bash

hook_auto_names()
{
        echo "merger_install_pre"
}

hook_run_merger_install_pre()
{
        source ${PALUDIS_EBUILD_DIR}/echo_functions.bash

        einfo_unhooked "Running lafilefixer"

        lafilefixer ${IMAGE}
}

vrijdag 23 september 2011

Xbox server - W.I.P. #2

On Tuesday I received the electrical components I ordered. So I immediately started designing a test PCB.
The PCB design was finished on Wednesday and of course I made the PCB as soon as I could. I made the PCB with a laser printer, a glossy photo paper, an iron and some iron 3 chloride.
Yesterday I soldered the components on the PCB.
Today I plan to test if the Xbox and the PCB are nice enough to give me a nice display on my monitor.


zondag 18 september 2011

Xbox server - W.I.P. #1

As I cannot make a VGA adapter right now I started some work on the heat sinks. The stock heat sinks of the Xbox are 'glued' to it with the so called Microsoft goo or bubble gum.

With some gentle force I pulled off the heat sinks of the GPU and CPU. Here you can see the goo.
To remove the goo I used acetone and some q-tips (this was described on some forums as being cheap and perfectly safe).
The result was quite good.
Now I did the heat sinks I moved on to the CPU and GPU. The CPU is on the left and the GPU on the right. You can clearly see the goo on them.
So I did the same as I did with the heat sinks. Q-tips, acetone and a lot of rubbing. The result is self explaining.
I ordered some Arctic Silver 5 thermal paste as replacement. I heard good things about it, so I hope it will help some. I want to cool the Xbox as quiet as possible, so passive cooling is a must.

Xbox server - Kick-off

I just started a new project or better said, restarted an old project.
I've got 2 XBox's laying around and I thought, let's make a server out of these.

I'm first going to try to get VGA output on one of these Xbox's. I tried it a couple of years earlier but failed at it.
The problem seems to be at getting the horizontal and vertical sync signals to give to a VGA connection.
There are 3 known methods of getting the sync signals:
  • Using Sync On Green
  • Using a sync splitter
  • Using the Xbox's internal sync signals
Sync On Green
The problem with SOG is that the monitor to be connected on it must support SOG. My monitors don't, and to prevent any future problems, I never attempted this. (Well I think I once did, but it didn't quite work. :-) )

Using a sync splitter
I've tried this method a couple of years earlier. I actually made a PCB for this one.
This was just a test. I just removed the actual PCB I tried to use, here are two pictures.


As you can see on the PCB I soldered some additional wires. With these wires I tried to fix what didn't work. The monitor kept showing the "not connected" message (before the wires) but after the wires the monitor just went to sleep.

But now I'm going for another try using the internal sync signals.

Internal sync signals
I looked up a tutorial on how to make this magic happen. Now it seems I need some electronics I don't happen to have. So I'm ordering right now :-)

I'm using this tutorial to mod one of my Xbox's.

I already did some work, but I'll put this in another post as this is getting a bit long :-)

maandag 12 september 2011

\s != &nbsp;

I'm using a lot of regex in Java because it's freaking handy. And so I'm walking trough some HTML and what did I find. The input String "<br>  </b>" wasn't matched by the regex "<br>[\\s]*</b>"! Which I found strange because a space is a whitespace, right? WRONG! The original text as it was on the web page was "<br> &nbsp;</b>" and the non-breaking space isn't included in the \s whitespace group.

So how did I solve it?
This problem can be solved by including \u00A0 in the regex ("<br>[\\s\\u00A0]*</b>") or by using \p{javaSpaceChar} in the regex ("<br>[\\p{javaSpaceChar}]*</b>").
The I couldn't find \p{javaSpaceChar} in most of the Java documentation, why? I don't know.